10.11.2010

Philly Beef and Cheese

If you are like me and have approximately 492 roasts in your freezer, you are always looking for a different way to serve roast.


I get sick of just plain roast or beef dip and Ben doesn't really like bbq beef sandwiches, so I'm always on the hunt for trying it a new way.


I was looking around the internet and saw many variations and different versions of this one and got a little overwhelmed.  I decided to go home and make up my own based on all the recipes I saw.  I wanted something easy and quick and that is exactly what this is.


I put my roast in my slow cooker that morning with some beef broth.  I cooked it on low all day while I was at work.  When I got home, I took it out of the slow cooker and let it cool....then I shredded it.


Then I mixed mayonnaise, minced garlic, salt, pepper and parmesan in a bowl.


And because marble was the only cheese I had, I used that.  If you are wondering why I only had marble...you can read part of that story near the end of this post.  I normally would have used swiss, provolone or havarti for this.


In a skillet I sauteed onions, green peppers and mushrooms (mmm....I love that combo) until soft.


Then on panini buns (you could easily use subs too) I spread the garlic mayo, added the cheese and shredded roast beef.


I broiled them in the oven until the cheese was all melted and gooey.  When they came out of the oven, I piled the green pepper mixture on them and served it with a mixed green salad.


Yeah...it was pretty flavorful and delicious!  The best part though was how fast and easy and simple it all was.  A perfect weekday meal for the busy person.

10.05.2010

Pita Pizzas

This is one of my "go to" meals.  It's what I make when I'm feeling lazy or don't know what to do.


It also works well for a "treat" when I have my niece or nephew over because they find it fun to "build your own pizza".


I make mine different each time because I generally use what I have on hand.  I didn't need to buy anything extra to make this dinner.  It's fun to be creative and see what you come up with.


I love thin crust pizzas so I use the thin pitas.  Ben likes the real pitas better and sometimes I buy them for him, but the "pocket" pitas were what I had in the freezer this time.


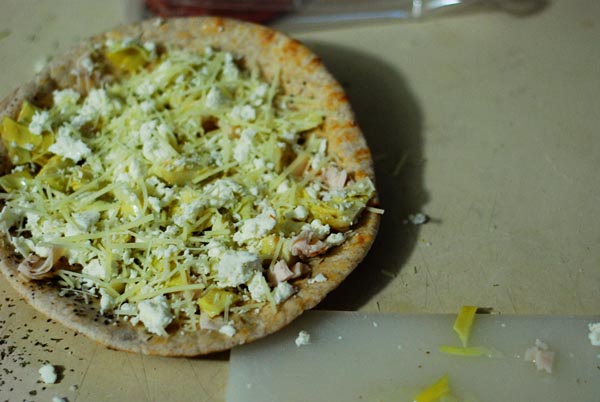
On my pita I brushed olive oil....sometimes I do pizza sauce, but I felt this pizza called for olive oil.


Then I sprinkled oregano, thyme, basil....


...and a little parmesan cheese.  I didn't leave it like that...I actually did spread it out a bit more. 


Because I had roasted chicken deli meat already, I chopped it up and added it.  Normally I would probably use real meat...I'm not the biggest fan of deli meat.


I love artichoke hearts...I have one of those costco size jars in the fridge.  I chopped some up and added them...


...and some feta as well.


And because I was feeling extra naughty, I added a little extra parmesan on top again.  Look at the pizza, not the mess around it, please. 


I forgot to take a picture of it, but I did add some pineapple on top...I love pineapple on pizza.


Bake it in the oven for about 20ish minutes at 400F.  It's a preference thing...sometimes I forget about them too and then we have extra crispy pizzas...mmmm.


Then cut it into quarters and it's perfect!  Everyone can have their own individual pizza to suit their taste.


That's why it works so perfect for Ben and I.  I like mine different.  I, also, like to put the cheese at the bottom if I'm doing a more traditional pizza with mozzarella.


Ben likes more "normal" pizzas...pepperoni and mushroom, meat lovers...those kind...and he likes his cheese on top.  We can't share pizza...we don't like the same kind...ever.


Here's a picture of Ben's...


We normally don't have "marble" cheese in this house. I don't understand marble cheese, so I don't really like it.  I don't eat cheese I don't understand.  We would normally have some mozzarella kicking around but the grocery store was out of it.  Weird right?  Who runs out of mozza?  I'm not even sure what made me get marble instead.  I normally would just leave it or get havarti or provolone or something completely different...not marble.


Maybe it was a full moon.

10.03.2010

October 4 - 8 and Some Roast Beef Talk

Here are our dinners for this week...


Monday: philly cheesesteak sandwiches with mixed greens

Tuesday: baja fish tacos

Wednesday: beef stroganoff - for the record...I do not like this...at all, however, since not everything needs to be all about me all of the time, I make this from time to time for Ben....he loves it.  It's something he really likes and I can choke back (if I make it my way...which isn't traditional stroganoff).  However, he is on his own for finding someone to make him stew and dumplings...that's where I draw the line.

Thursday: warm quinoa, spinach and shiitake salad

Friday: on our way for our traditional thanksgiving long weekend, so whatever we have for dinner is usually "to go".


I'm trying 2 new recipes this week.  I'll let you know how they turn out.


Also, I have 8 more roasts in my freezer....please give me some new and creative ideas on what I can do with them...I only have a few more weeks until I get my freezer filled up with beef again.


I plan on making a beef barley soup with one of them.


And with the mennonite in me, I'm going to learn to make fleisch perishky (meat buns).  I've never made them because I am not good at baking.  I also love my mom's and grama's so much I normally just mooch off them.  Some recipes use ground beef, but my mom and grama use left over roast beef that they mince up and add some of the roast gravy with...that's what I plan to do with one of the roasts....so that leaves me with 6 more.


I'm getting sick of plain roasts dinner...I need ideas...so help me...please.

Gourmet Caramel Apples

*WARNING: THIS POST IS PICTURE HEAVY*


A couple of weeks ago, my sister asked me to babysit my niece and nephew for a sleepover night.  I love having them over because it gives me a reason to try and come up with fun things to do with them.


I had this grand plan to make caramel apples....gourmet caramel apples.  As per my usual non-parental self, I didn't plan things quite as I should have considering they are 6 & 7 years old.


However, I did document it, so hopefully it will encourage you to try something fun and different on a weekend day with your kids...or kids you are babysitting.  It really is easy and fun to do with kids...just plan on having lots of time and lots of mess.


For starters...don't start at 7pm at night....make it a day plan.


Make sure you enlist their help unwrapping about a billion little caramels (and plan for this to take way too long...


...and bribe them with a taste for every 20 they unwrap...


In a heat safe bowl, over boiling water, melt caramels and cream or milk...whatever you want.  I didn't really measure, I just dumped some in.


Plan for this to take waaaay too long.


Keep stirring and watching it until it is a smooth consistency...


In my normal unorganized fashion, I didn't take a picture of the apples before.  We used ones from my mom and dad's trees so we didn't need to dip them in boiling water first because they didn't have that wax on them that store bought ones have.  If you are using store bought, just quickly dip them in boiling water for a few seconds and put in fridge to cool immediately.  Apples that are pretty tart work best because they hold up to the sweetness of the caramel.


You can buy longer thicker skewers for stabbing in the apples.  Don't use those flimsy thin ones.  You can also use popsicle sticks, but they don't look as nice.


I found it works best when you have enough caramel to fully submerge the apples into it.  Use a spoon to make sure the apple is completely covered in caramel.


Try to let as much caramel run off it as possible...you only need a thin coat on it, otherwise all your candies you stick to it will run to the bottom (you'll see in later pictures).


Are you wondering what Ben and Kaeden are doing while Livi and I work in the kitchen?


Don't worry, though, they came in to do some of this...


After you've dipped your apples in the caramel, roll them in whatever toppings you want.  I was helping Livi at this point so I didn't get any pictures of the dipping and rolling in candies.  We had a variety of chocolate chips, skor chips, reese chips, peanuts, almonds, smarties, marshmallows, cinnamon sugar, white chocolate and milk chocolate.  We took everyone's "order" and made each one custom.  Next time I think I would dip it in the caramel, just leave it, then do a chocolate layer and attach the candies to that.  The chocolate doesn't run as much as the caramel and as you can see, the treats were all sitting at the bottom.


This is very important....make sure your wax paper is sprayed or use parchment paper.  The caramel STICKS to everything!  We put on on a plate with no spray...it was not easy to get off!


At this point, put them in the fridge to set for 1/2 hour or so.  Or in our case, overnight because now it's way past the kids bedtime (due to our 7pm start) and plan to finish them in the morning.


In the morning melt your next layer...in our case it was milk chocolate for Don's rocky road caramel apples.


Please ignore the Christmas decorations hanging up.  No, I did not start to decorate already...they haven't come down from last year.  I wrecked the wall trying to hang them and haven't found a "replacement" piece to put up instead of those, so I've left them up to cover my mistakes....and by "found" I  mean "made" because I plan on making something for that spot...but I am a procrastinator so it hasn't happened yet.


Where were we?  Oh yes....the next morning.


When you realize that you have been so busy making caramel apples that you forgot to give the kids some breakfast, let them snack on candies, caramel and chocolate....


Again...I did not take pictures of the milk chocolate layer, because I was helping....it's easy though.  You just dip or drizzle or whatever you want on the next layer of the caramel apple and put it back in the fridge.


Then you start to melt your next layer...white chocolate.


It's best at this time to wait until the kids mother (my sister) arrives because then you can get her to help.


And once again....no pictures of the final steps, but it's not really needed.  You just dip and drizzle and decorate them to however you want.


Here is our finished product from left to right....

-caramel, skor chips, peanuts, white chocolate drizzled
-caramel and smarties
-rocky road (caramel, peanuts, milk chocolate, marshmallows, white chocolate drizzle and more peanuts)
-apple pie (caramel, white chocolate, brown sugar and cinnamon) and for the record...this one was mine and it was DELICIOUS!!!
-caramel, reese chips, white chocolate, cinnamon sugar


And with the leftovers from each layer....


...we put on a cookie sheet and put in the freezer.  When frozen, smash it up and makes a delicious little candy treat!


If you have any questions please ask!  You don't need a "recipe" to do this.   I'll put it in point form to review....

- melt caramels with a little cream or milk
- if using store bought apples, dip in boiling water for a few seconds to remove wax and put in fridge to cool
- use sturdy and thick enough skewers that won't break off when used to hold apple up.  take stem off apple and stab skewer through the top of the apple.
- when caramel is melted and smooth, dip apples in.  try to get as thin as a coat on the apple as possible
- at this point, you find your creative self and do what you want.
- put apples in fridge to cool for about 1/2 hour
- the move on to dipping or drizzling whatever chocolate you want and however you want.
- let set in fridge
- eat when ready!!


Let me know if you try it!

10.01.2010

Apricot Macaroons


Almost a year ago I bought a 5 pound bag of dried apricots.


Turns out...I don't like dried apricots.


On their own anyways....  I like them "in" things.  It's another one of those items that I like the flavour of...just not on their own....does that make sense?


So I've had this bag in the freezer for a almost a year.  Whenever I see a recipe that has apricots in it and looks good, I jump at the chance to try it.


I was reading some of my cookbooks that I haven't looked at in awhile.  One of them is a "Low Fat Express" Company's Coming book.  I stumbled across this recipe.


I thought I would give it a go...which I did.


They took longer than the 12 minutes it says.  I also only had sweetened shredded coconut so that's what I used.  I'm not sure if it's because I didn't "pack" them into the tablespoon when I scooped and dropped them on the parchment paper or if they are just crumbly, but it sorta turned into a cookie crumble trail mix sort of snack.  They completely fell apart.


That picture up top were the only cookies that stayed whole...and they were very delicate and pretty much crumbled when I picked them up again to put away.


Anyways...they were good, but I don't think I'd make them again.


So I continue on my apricot recipe finding journey. 


I thought I would share this recipe in case you happen to have a five pound bag of apricots in your freezer.


PRINTABLE RECIPE HERE


Let me know if you try it and if you have better luck with it.

Asiago Beef and Bow Ties


It's that time of year when everyone is making roasts in their slow cookers for dinner.  You always know with the next couple of days there will probably be beef dip or roast beef sandwiches for lunch.


Want to try something different with your roast left overs?


I got this recipe out of Company's Coming "Meal Salads".  I don't think of this one as a salad, though.  I didn't serve it cool as the recipe suggests...I served it warm.  It was a perfect way to use up some roast leftovers.


Here's the recipe as it is in the book...the changes I made are at the end...


Asiago Beef and Bowties

8 cups water
1 tsp salt
2 cups medium bow pasta

1 1/2 cups chopped fresh asparagus

2 cups chopped deli shaved beef (or minced cooked roast beef)
1 cup grape tomatoes
1/4 cup sliced green onion

Creamy Asiago Dressing
1/2 cup grated asiago cheese
1/4 cup sour cream
2 tbsp white wine vinegar
1 tbsp cooking oil
1/4 tsp salt
1/4 tsp pepper

Combine water and salt in dutch oven.  Bring to a boil.  Add pasta.  Boil, uncovered, for 9 minutes, stirring occasionally.

Add asparagus.  Cook, uncovered, for 4-5 minutes, stirring occasionally, until pasta is tender but firm and asparagus is tender-crisp.  Drain.  Rinse with cold water.  Drain well.  Transfer to large bowl.

Cream Asiago Dressing: Combine all 6 ingredients in small bowl.  Makes about 1/2 cup.

Add to past mixture.  Toss.  Chill for 2 hours to blend flavours.  Makes about 8 cups.


Here are my changes:

- as you can tell by the picture, I didn't chop the asparagus.  I like food to have different shapes and sizes...I don't want everything chopped the same size, so I didn't.
- I shredded leftover roast
- I didn't rinse the pasta and asparagus with cold water because I wanted a warm meal.
- which means I did not chill it for 2 hours....it was so good still!  I also had it for leftovers the next day and it was just as good!


PRINTABLE RECIPE HERE

Any questions?  Just ask!

Homemade Granola Bars


Another one of those foods that fall into the category of "why buy when you can make it?"


I actually never thought of making my own granola bars, but on my recent trek of trying to budget and also being more aware of what I'm eating, I discovered you can make them....and they are easy!!


I did search high and low for a recipe I liked and read a bunch of reviews to come to my decision to try this one...


Easy Granola Bars


I don't like those hard crunch granola bars...I like soft chewy ones.  I followed the recipe pretty closely for my first attempt at homemade granola bars.


The couple of changes I made were very minor...

 - I used shredded coconut because that's what I had
 - I don't like sliced almonds, but I do like almond flavour (I have no idea why...it's a texture thing), so I put whole almonds in my food processor and blended them to a powder.
 - I used regular sized chocolate chips because that's what I had


I baked it for exactly the 20 minutes, let it cool for 5 and then used a pizza cutter to cut the bars.  I left it in the pan until it was COMPLETELY cooled and then put it in the freezer until they were frozen.  I took them out, wrapped them individually and put them back in.  They taste fine straight out of the freezer, but I like them best as my mid morning snack when they've had time to soften and are perfectly chewy.

The parts where I couldn't get it all blended together nicely were too dry and crumbly, so I'll have to figure something out for next time.


I'm thinking of doing peanut butter with peanuts.  My brother in law did honey instead of the sweetened condensed milk and he said theirs turned out fine.  I might try a peanut butter and honey combo....and it would be better for you than the condensed milk.


It's a good "base" recipe...you could add any flavours you want to it.


Let me know if you try it!